
Pe scurt: Fix a plastic grid mesh to the wall at 40–50 cm fixing centres using large washers, hang the panels from a top corner and tie each one to the mesh at its corners and centre. Two people can complete a 15 m² wall in a day.
All Weather Greens manufactures artificial green wall panels in 100 × 100 cm and 50 × 50 cm formats. Installation is a cladding job rather than a landscaping project. There is no irrigation, no drainage, no growing medium and no plant establishment period. What decides whether an installation looks right on handover day — and in year three — is the sequence: how the wall is surveyed, how the panel grid is set out, how the panels are fixed, and how the edges are detailed.
This guide is for trade installers, fit-out contractors and landscapers fixing artificial green wall panels for the first time, and for buyers who need to understand what the work actually involves before quoting a project. It covers interior and exterior work, and the points where the two differ.
If you are here for the commercial overview instead — panel range, MOQ, lead time and delivery terms — start with the gama de panouri pentru perete verde artificial sau citiți wholesale terms and MOQ. This article is the step-by-step version.
What you need to confirm before you start
Installation is quick, but it is not improvised. Confirm four things before a panel comes out of the crate.
- The substrate. Masonry, render, gips-carton, concrete, timber or metal cladding? This decides the fixing method more than any other single factor, and it is the most common cause of a failed installation.
- Panel size and layout. Panels are supplied as 50 × 50 cm and 100 × 100 cm modules. Measure the wall and work out where the module grid lands before you fix anything.
- Interior or exterior. Exterior work needs UV-stabilised panels and a fixing detail that accounts for wind loading and water. Interior work does not.
- The mesh and fixing pack. Plastic grid mesh, wall plugs, șuruburi, large washers and cable ties. Outdoors, specify stainless or galvanised screws and UV-resistant ties. Confirm this at quotation stage rather than on site.
All Weather Greens confirms the panel format and the fixing method together at quotation stage, because the substrate — not the panel — is the most common cause of a failed installation.
How to install an artificial green wall: the sequence
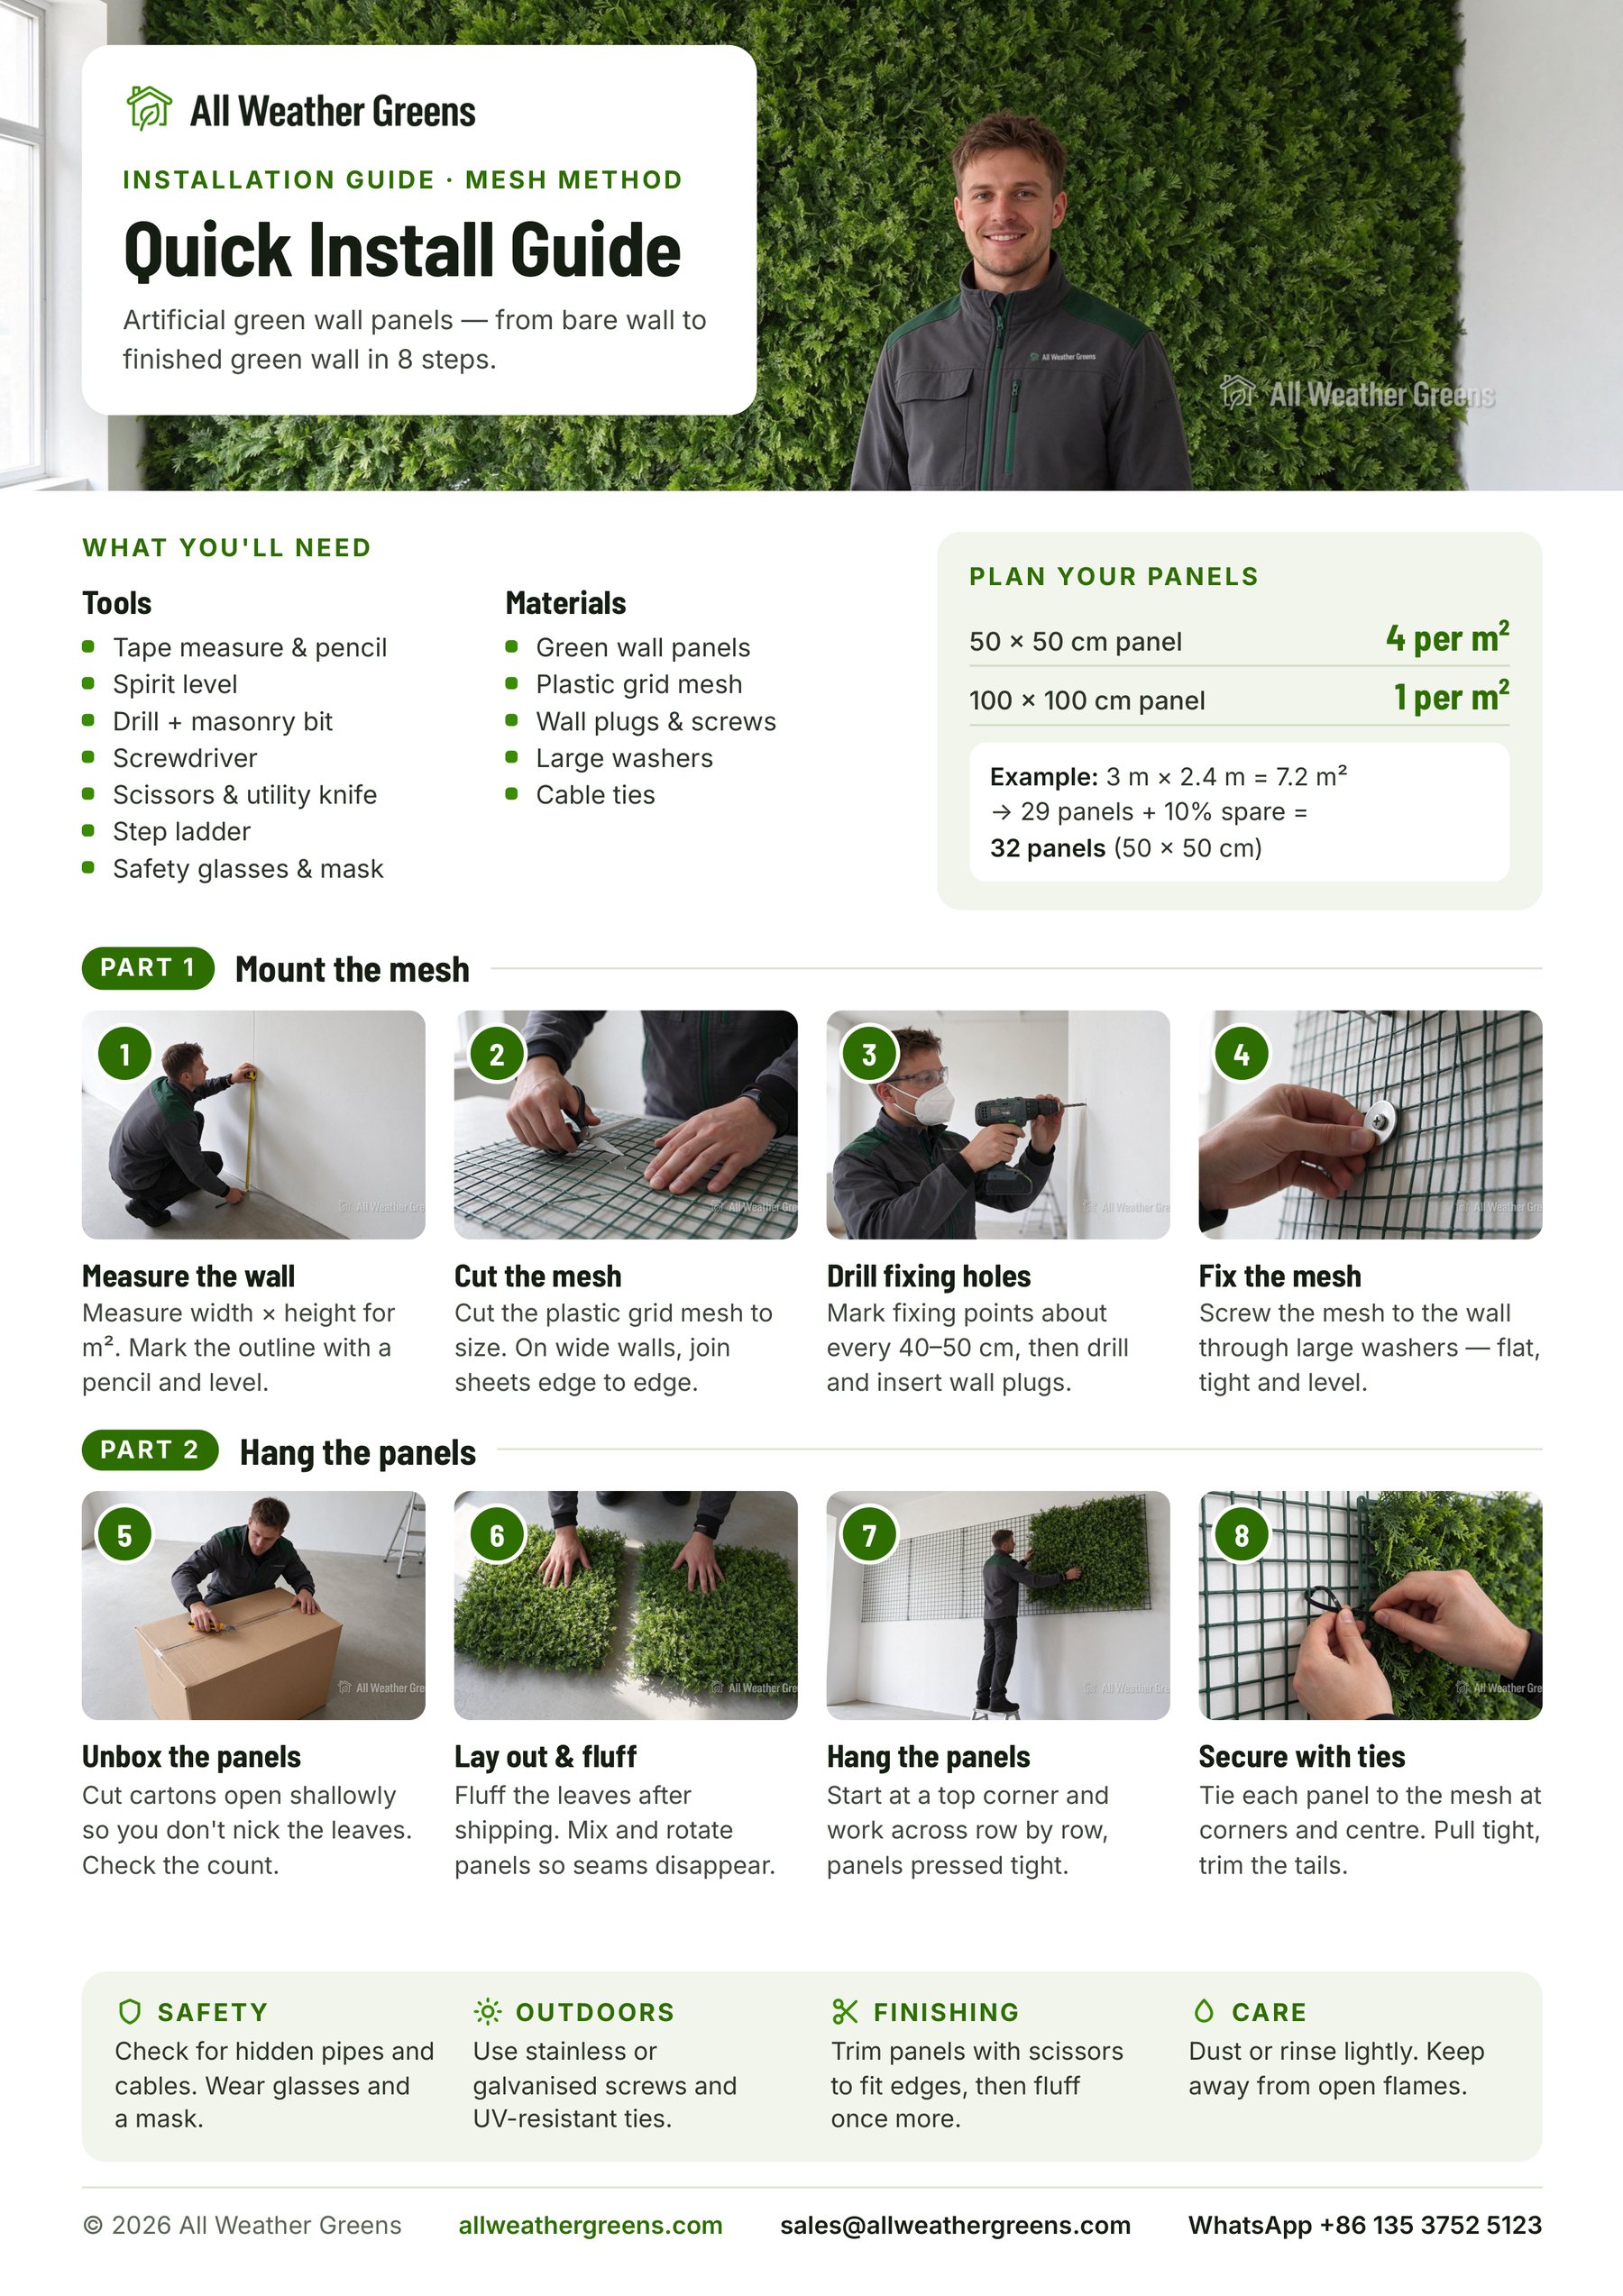
The 8 steps at a glance — tools, mesh fixing, panel hanging and edge finishing on one A4 page. Download the printable PDF.
1. Measure the wall and work out the panel count
Measure the width and the height, multiply them out for the area, and mark the outline on the wall with a pencil and a spirit level. Panels are supplied as 50 × 50 cm modules at four per square metre and 100 × 100 cm modules at one per square metre, so the count follows from the area: a 3 m × 2.4 m wall is 7.2 m², which is 29 panels of 50 × 50 cm plus 10% for cuts and spares — 32 panels.
Set the panel grid from a corner or datum line the client will actually see, not from the least visible edge, so that the last column is the one you cut — never the first. On a 100 × 100 cm module a 4.2 m wall is four full panels plus a 20 cm return; on a 50 × 50 cm module the same wall is eight full panels plus the same 20 cm return, which usually reads better because the cut strip is proportionally narrower. If the wall has a doorway, window or signage, set the grid so the panel joints fall symmetrically around it — asymmetry at a doorway is what makes an otherwise good installation look cheap.
2. Cut the mesh to size
Cut the plastic grid mesh to the marked outline. On wide walls, join sheets edge to edge so the mesh runs continuously behind the panel joints rather than stopping at them.
3. Mark and drill the fixing holes
Mark fixing points at roughly 40–50 cm centres across the mesh, then drill and insert wall plugs. Note any services — sockets, downpipes, vents, alarms — that must stay accessible, and keep fixings clear of them. Where the substrate is badly out of plane, is plasterboard, or needs a void for services, fix a batten or subframe layer first and mount the mesh to that; on a sound, flat masonry or concrete wall the mesh goes straight on.
4. Fix the mesh to the wall
Screw the mesh on through large washers, so the load spreads across the grid instead of pulling through a single strand — flat, tight and level. Outdoors, use stainless or galvanised screws: plated screws and ordinary ties are the parts that fail first on an exposed elevation.
5. Unbox and check the panels
Cut the cartons open shallowly so you do not nick the leaves, and check the count against the order before anything goes on the wall. Cartons ship with packing documentation, and that record is what a damage claim is handled against.
6. Lay out and fluff the panels
Fluff the foliage after shipping, and mix panels from different cartons before you start, rotating them so that batch variation and the panel seams disappear across the elevation.
7. Hang the panels
Start at a top corner and work across row by row, panels pressed tight to each other, keeping the foliage lying in the same direction across the whole wall. Resist rushing the first column: everything after it inherits that alignment. Check the face for flatness as you go with a straight edge — a panel that is 5 mm proud at column two will be visibly bowed by column six.
8. Secure each panel to the mesh
Tie each panel to the mesh at its corners and at the centre, pull the ties tight and trim the tails so nothing shows through the foliage. Outdoors, use UV-resistant ties: standard cable ties embrittle in sunlight, and they are the cheapest component on site to get wrong.
Finishing: tăiere, dressing and handover
Cut the final column and any cut-outs with a sharp blade against a straight edge, then weave the cut foliage back over the trimmed edge so no backing or cut stem is visible. The same applies at the top, the bottom and any reveal: fold, tuck and blend rather than leaving a straight mechanical edge. Detail the perimeter before you tidy up, not after — once the site is clean it is much harder to justify going back to a top edge.
Then stand back and look along the wall from both ends and from the main viewing angle. Fluff any foliage that was compressed in transit or by handling — this takes minutes and is the difference between “installed” și “finished”. Remove offcuts and dust, then hand over. On a flat wall with a marked grid, two people cover about 15 m² in a day — the variable that moves that number is the substrate, nu panoul.
Interior and exterior installation: where they differ
| Point | Interior | Exterior |
|---|---|---|
| Panel specification | Standard foliage panel | UV-resistant panel with UV inhibitors compounded into the material |
| Fixing | Plastic grid mesh, screws and washers, cable ties | Plastic grid mesh, stainless or galvanised screws, UV-resistant cable ties |
| Drainage and ventilation | Not usually required | Mesh holds the panel clear of the wall |
| Wind loading | Not applicable | Must be considered for exposed elevations |
| Warranty basis | 5 ani pentru interior | 3 ani în exterior, subject to the stated conditions |
Performanța ignifugă și cea de stabilizare UV sunt cerințe separate și nu sunt automat prezente în același panou. If your project needs a reaction-to-fire classification, say so at enquiry stage and we will confirm what documentation we hold and what it covers — EN 13501-1 documentation is available on request. The specification, the fixing method and the warranty all change at that line: All Weather Greens warrants 5 years indoors and 3 years outdoors, and the outdoor figure applies only to UV-stabilised panels fixed with corrosion-resistant screws and UV-resistant ties.
Five mistakes that show up on handover day
- Grid set from the wrong corner. Trimming the first column instead of the last leaves an obvious narrow strip at the most visible end.
- An uneven wall left uncorrected. The mesh and the panels both follow the substrate, so any bow in the wall becomes a bow in the greenery.
- Cut edges left exposed. Backing and cut stems visible at a reveal are the single clearest sign of an amateur installation.
- Standard ties and plated screws outside. UV embrittles ordinary cable ties and plated screws corrode at the head; specify UV-resistant ties and stainless or galvanised fixings.
- Foliage not dressed after fixing. Ten minutes with your hands at the end changes how the finished wall reads.
Maintenance after installation
There is no irrigation, fără fertilizare, no pruning and no plant replacement. An occasional dusting or a low-pressure rinse is the entire maintenance plan. On exterior walls, a rinse before and after the dusty season keeps the foliage looking fresh, and it is worth writing that into the client’s facilities schedule as a single line item rather than assuming someone will do it. Where wind-blown sand and dust load is high — Gulf elevations, for instance — that rinse needs to be more frequent; the same applies to artificial green walls supplied to Saudi Arabia.
Întrebări frecvente
How long does installing an artificial green wall take?
A straightforward interior feature wall is a matter of hours for a two-person team, plus any mesh or substrate preparation. Exterior elevations and walls that need a services void or extensive trimming take longer. The installation itself is rarely the critical path — delivery and site access usually are.
Can I install panels directly onto a wall without a subframe?
da. The standard method fixes a plastic grid mesh straight onto the wall, with no timber or metal subframe: the mesh carries the panels and spreads the fixing load through the washers. You need a batten or subframe layer only where the substrate is badly out of plane, is plasterboard or lightweight cladding, or where you need a void for services. For exterior work, use stainless or galvanised screws and UV-resistant ties.
What is the lead time if I order panels for a project?
Comenzile de producție se realizează în 10–15 zile lucrătoare după aprobarea comenzii și a specificațiilor. Transportul se cotizează separat și respectă calendarul confirmat în oferta dumneavoastră. Ready-stock 50 × 50 cm designs are dispatched within 5 working days. If your programme is tight, tell us the installation date at enquiry stage and we will tell you honestly whether it works.
Do I need special tools?
Standard trade tools: tape measure and pencil, spirit level, drill with a masonry bit, screwdriver, scissors and a utility knife, and a step ladder. Add safety glasses and a mask for drilling. No specialist equipment and no horticultural knowledge.
What happens if a panel arrives damaged?
Tell us before installation with photographs of the panel and the packaging. Panels ship in cartons with packing documentation, and claims are handled against that record — which is also why it is worth photographing the crate on arrival on any container order.
Next step
We supply the gama de panouri pentru perete verde artificial to importers, Angrosiști, peisagiștilor și antreprenorilor de proiecte, direct de la fabrică din China. If you are pricing a project, you can request a free sample box to test the material and fixing approach before you commit, read the wholesale terms and MOQ, or see our project evidence and documentation guidance.
Send the wall dimensions, the substrate and the installation date, and we will come back with panel quantities, fixing recommendations and a landed cost.